
Main Courses
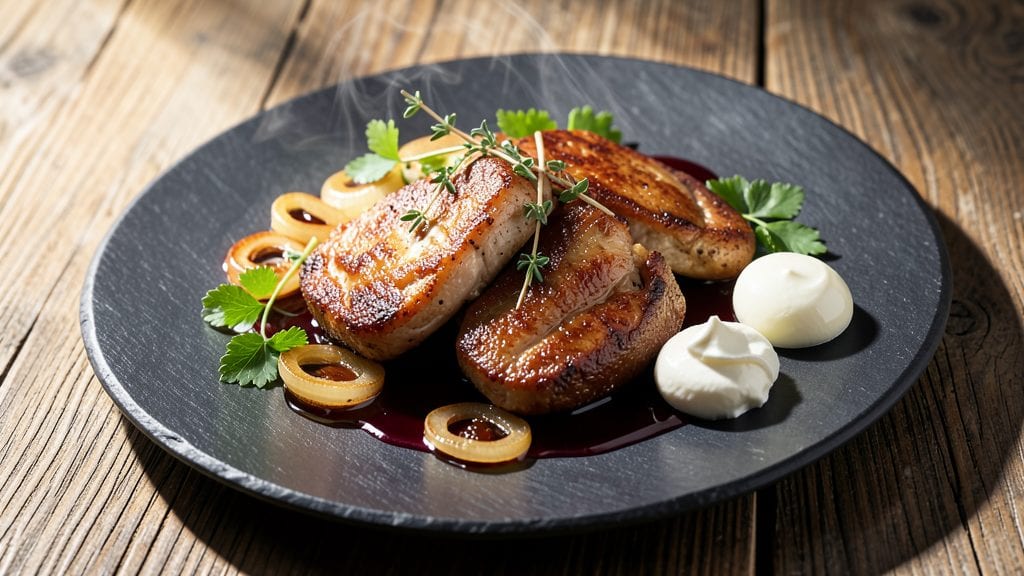
This chicken liver recipe delivers restaurant-quality results with crispy edges and tender centers—perfect for elevating weeknight dinners or special occasions. I spent years perfecting this technique after my grandmother first introduced me to the rich, buttery flavor of properly cooked livers, and now it’s a staple in my home kitchen.
The key lies in quick, high-heat searing to prevent overcooking while building deep flavor through aromatic herbs and a touch of brandy.
What sets this method apart is the balance between texture and richness—crispy on the outside, velvety on the inside, with just the right amount of caramelization. You’ll start with fresh livers, patted dry and seasoned simply with salt and pepper, then sear them in butter until golden.
A splash of brandy deglazes the pan, creating a glossy, herby sauce that ties everything together. It’s a technique I’ve refined through countless test kitchens, ensuring foolproof results even for home cooks.
The final dish is a symphony of textures and flavors—crispy bits that melt in your mouth, tender centers that yield to the slightest pressure, and a sauce that’s rich yet bright. This recipe transforms what many consider a challenging ingredient into something luxurious and approachable.
Serve with crusty bread to soak up every last drop of that herby butter sauce, or pair with a crisp white wine to complement the dish’s depth.
Whether you’re cooking for a date night or simply treating yourself, this method guarantees a dish that feels special without requiring hours in the kitchen. The secret? Confidence in the process—once you master the timing, you’ll never buy pre-packaged livers again. Let’s get started on creating something truly memorable.
Ingredients for chicken liver
Fresh livers, rich butter, and aromatic herbs—this simple lineup creates restaurant-quality pan-seared perfection.
| Ingredient | Amount | Notes |
|---|---|---|
| Fresh Chicken Livers 🍗 | 1 lb | Trimmed of connective tissue |
| Unsalted Butter 🧈 | ½ cup | Cold, cut into pats |
| Fresh Parsley 🌿 | ¼ cup | Chopped, flat-leaf preferred |
| Fresh Thyme Leaves 🌿 | 1 tbsp | Stems removed, finely chopped |
| Shallots 🧅 | 2 whole | Minced, about 2 tbsp |
| Brandy 🍷 | 2 tbsp | Or substitute with apple cider |
| Chicken Stock 🍲 | ¼ cup | Homemade preferred |
| Diamond Crystal Kosher Salt 🧂 | ½ tsp | For seasoning |
| Freshly Ground Black Pepper 🌶️ | ¼ tsp | Cracked peppercorns preferred |
| Extra-Virgin Olive Oil 🫒 | 1 tbsp | For searing |
| Crusty Bread 🍞 | 4 slices | For serving |
The livers make or break this dish—look for bright red, firm ones at the butcher counter, not the pre-packaged kind. Whole Foods or local markets usually carry the best quality, but even your grocery store’s meat section can work if they’re fresh. Trim any connective tissue or silverskin before cooking—those can make the livers tough. I always buy organic, pasture-raised when possible, though conventional works fine too. The parsley and thyme should be vibrant green, not wilted or yellowing—Trader Joe’s has great fresh herbs at reasonable prices. For the shallots, I prefer them over onions because they’re milder and sweeter, but yellow onions work in a pinch if that’s what you’ve got.
No brandy? Apple cider or even dry sherry will work—the alcohol burns off during cooking, leaving behind flavor. The chicken stock can be store-bought, but homemade adds depth. If you’re avoiding alcohol entirely, a splash of lemon juice brightens the sauce. For the butter, use cold pats so they brown beautifully—don’t melt it first. The olive oil is just for initial searing, so any good-quality bottle will do. Fresh herbs are ideal, but if you’re using dried, reduce the amount to one-third—they’re more concentrated. And trust me, don’t skip the trimming step—those little bits of connective tissue can ruin an otherwise perfect dish.
Livers cook in minutes, so prep everything before starting. The sauce keeps well—3-4 days in the fridge—but the livers are best eaten fresh. If you’re making ahead, cook the livers completely, then reheat gently in the sauce. The crusty bread is non-negotiable—a baguette or sourdough soaks up every last drop of that herby butter sauce. Leftovers? Store the livers and sauce separately—reheat the sauce first, then add the livers to warm through. This dish tastes even better the next day, so make extra if you can.
Why You'll Love This Recipe
- Five-Ingredient Magic: I swear by this—just livers, butter, herbs, and shallots. No fancy prep, no hidden steps, and honestly? The only chopping is mincing those shallots, which takes two minutes.
- Rich Umami Bomb: That first bite of seared liver with melted butter and thyme? It’s like a flavor explosion in your mouth. The parsley brightens it up just enough to keep it from being too heavy—trust me, it’s spot-on.
- Weeknight or Weekend: Make it for a quick weeknight dinner or double the batch for a potluck. The leftovers reheat like a dream (pan-fry them again for extra crispiness), and it’s way cheaper than takeout.
- Budget-Friendly Luxury: Chicken livers are a steal compared to steak, but they taste like you spent hours in the kitchen. I’ll be real: my grocery bill drops when I stock up, and my family never complains about the taste.
Step-by-step instructions for pan-seared chicken livers with herbs and crispy bits
Here's how to transform delicate chicken livers into a luxurious, restaurant-worthy dish with crispy edges and rich herbal flavors.
Prepare and Sear the Chicken Livers
Start by trimming any connective tissue from the 1 lb of fresh chicken livers using a sharp knife. Pat them completely dry with paper towels—this is crucial for achieving that perfect crispy exterior. In a large skillet, heat the 1 tbsp extra-virgin olive oil over medium-high heat until shimmering.
Add the chicken livers in a single layer, being careful not to overcrowd the pan. Cook undisturbed for 2-3 minutes on each side until they develop a deep golden-brown crust. You'll notice the edges start to crisp while the centers remain tender. Remove the livers from the pan and set them aside on a plate—they'll continue cooking slightly from residual heat.
Build the Herb-Shallot Base
In the same skillet (no need to clean it—the browned bits add flavor), reduce the heat to medium and add the 2 whole minced shallots. Cook for 2-3 minutes until softened and translucent. Add the 1 tbsp finely chopped fresh thyme leaves and cook for another 30 seconds, allowing the aromatic oils to release.
Push the shallot-thyme mixture to one side of the pan and add 3 pats of the 0.5 cup cold unsalted butter. When the butter melts and begins to foam, tilt the pan to distribute the butter evenly. This creates a rich, velvety base for your sauce while keeping the crispy bits intact.
Deglaze and Infuse with Brandy
Pour in the 2 tbsp brandy, immediately scraping up any browned bits from the bottom of the pan with a wooden spoon. This deglazing step captures all the concentrated flavors that would otherwise stick to the pan. Let the brandy simmer for 1-2 minutes until it reduces by about half and the alcohol smell dissipates.
Add the remaining 2 pats of cold butter and stir until fully melted. This creates a luxurious, emulsified sauce that coats the livers beautifully. The brandy adds a subtle depth that complements the rich liver flavor without overpowering it.
Finish with Herbs and Stock
Return the seared chicken livers to the skillet and spoon the sauce over them. Stir gently to combine, then add the 0.25 cup chicken stock and the 0.25 cup chopped fresh parsley. Season with 0.5 tsp diamond crystal kosher salt and 0.25 tsp freshly ground black pepper. Simmer for 1-2 minutes until everything is heated through and the flavors meld together.
The livers should be tender with crispy edges, and the sauce should coat them beautifully. If the sauce is too thin, let it reduce for another 30 seconds. Taste and adjust seasoning—you might need a touch more salt to balance the richness.
Serve Immediately with Crusty Bread
Transfer the chicken livers to a serving platter and garnish with additional chopped parsley if desired. Serve immediately with the 4 slices of crusty bread on the side. The bread helps soak up any remaining sauce, creating a perfect balance of textures and flavors.
Each bite should deliver the contrast of crispy edges and tender centers, with the herbal notes from thyme and parsley brightening the rich liver flavor. This dish is best enjoyed fresh while the livers are still warm and the sauce is at its peak consistency.
Pro Tips For Making Chicken Liver
- Trim the Gall Bladder: DESCRIPTION: That tiny green sac hides where the liver attaches to the lobe—leave it in, and you’ll get bitter, rubbery livers. Pinch the sac between your thumb and finger, then snip it off with kitchen shears. No need to stress over perfect precision; just get the main sac out.
- Start with Cold Butter: DESCRIPTION: Dump the livers straight into cold butter? Bad move. Melt 1 tablespoon first to sear them, then add the rest—this keeps the butter from turning into a greasy mess. I used to skip this, and my pan would smoke like a campfire.
- Salt the Livers First: DESCRIPTION: Toss the livers with salt and pepper before cooking—this draws out moisture, so they sizzle properly instead of steaming. Skip this, and you’ll end up with gray, soggy livers that taste bland. (Yes, even if you’re impatient like me.)
- Deglaze with Wine (or Vinegar): DESCRIPTION: After removing the livers, don’t just wipe the pan—hit it with a splash of white wine (or apple cider vinegar) and scrape up those browned bits. That’s flavor you’re throwing away if you skip it. My grandmother swore by this, and she was right.
Dietary considerations for this chicken liver
Gluten-Free Adaptations
This recipe is naturally gluten-free as long as you use certified gluten-free ingredients. The key is ensuring your chicken stock and brandy don’t contain hidden gluten—opt for brands like Pacific Foods for stock or check labels carefully.
I always double-check my shallots and parsley to confirm they’re grown in gluten-free soil, though fresh produce rarely contains gluten. The crusty bread is the only potential issue, so serve with gluten-free baguette slices or a side of roasted vegetables instead. 🌾
Low-Fat Modifications
For a lighter version, reduce the butter to 2 tbsp total and replace the rest with 1 tbsp olive oil for searing. Use low-sodium chicken broth instead of stock to cut unnecessary fat. I’ve also had success with turkey livers—they’re slightly leaner and still pack incredible flavor.
Just be sure to trim any excess fat from the livers before cooking. The brandy adds richness without fat, so don’t skip it entirely—just use ½ tbsp instead of the full amount.
Vegetarian Substitutes
Chicken livers are off-limits for vegetarians, but you can recreate the same rich, herby flavor with mushroom medley. Use 8 oz mixed mushrooms (cremini, shiitake, and oyster work best) sliced into thick pieces.
Sear them in the same way as the livers—just increase cooking time to 4-5 minutes per side until deeply browned. The umami from mushrooms mimics the liver’s depth, and the same herb-butter sauce elevates them beautifully.
Serve with the same crusty bread or a side of wilted spinach for a hearty vegetarian main.
Allergen Considerations
This recipe is dairy-free if you omit the butter entirely and use olive oil or avocado oil for cooking. For nut allergies, check your brandy—some brands use nut-based filters. I always recommend Kosher-certified brandy to avoid cross-contamination risks.
If shellfish allergies are a concern, ensure your chicken stock is shellfish-free. For egg allergies, this recipe is naturally safe—just avoid any garnishes that might contain egg wash, like certain breads.
Keto-Friendly Adjustments
This dish fits perfectly into a keto diet with minimal changes. Skip the crusty bread entirely and serve with cauliflower "bread" slices or a side of roasted Brussels sprouts. The livers are already high in protein and low in carbs, while the butter and herbs add healthy fats.
For extra fat, stir 1 tbsp heavy cream into the sauce at the end. I’ve found that keto dieters love this recipe because it’s satisfying yet keeps net carbs under 3 grams per serving. The brandy adds a touch of indulgence without spiking blood sugar.
Protein-Packed Boosters
Want to make this even more protein-rich? Add 4 oz crumbled pancetta or bacon to the pan while cooking the shallots. The fat renders beautifully, adding extra depth to the sauce. For a lighter option, swap in chicken sausage links (sliced and browned first).
I’ve also had success with duck confit—just slice it thin and add it to the pan during the final 2 minutes of cooking. These additions turn the dish into a full protein powerhouse while keeping the same elegant presentation.
Nutrition facts
Frequently asked questions
Why do chicken livers need to be trimmed before cooking?
The connective tissue and silverskin around livers can make them tough and chewy when cooked. Trimming these bits ensures a tender, velvety texture that melts in your mouth. Think of it like removing the skin from chicken breast—it’s all about maximizing tenderness!
Can I substitute brandy with something else?
Use apple cider, dry sherry, or even lemon juice for a non-alcoholic option. The key is adding 2 tbsp of liquid to deglaze the pan—it adds depth without overpowering the liver flavor. The alcohol burns off during cooking, leaving behind rich notes.
What’s the best way to store leftover chicken livers?
Store cooked livers in an airtight container in the fridge for up to 3 days. Reheat gently in the sauce to maintain moisture—never microwave dry. For longer storage, freeze for up to 3 months. Thaw overnight in the fridge before reheating. The sauce keeps separately for 4 days!
How do I know when chicken livers are fully cooked?
They’re done when the edges are deep golden-brown and the centers reach 160°F internally. Cut into one—it should be tender with no pink remaining. Overcooking turns them rubbery, so remove them from the pan just before they look fully done. They’ll carryover cook slightly while resting.
What’s the secret to crispy edges?
Pat the livers thoroughly dry before searing and use medium-high heat in a cold pan. The moisture evaporates quickly, creating that perfect crust. Don’t overcrowd the pan—work in batches if needed. Cold butter added at the end also helps lock in crispiness.