Main Courses
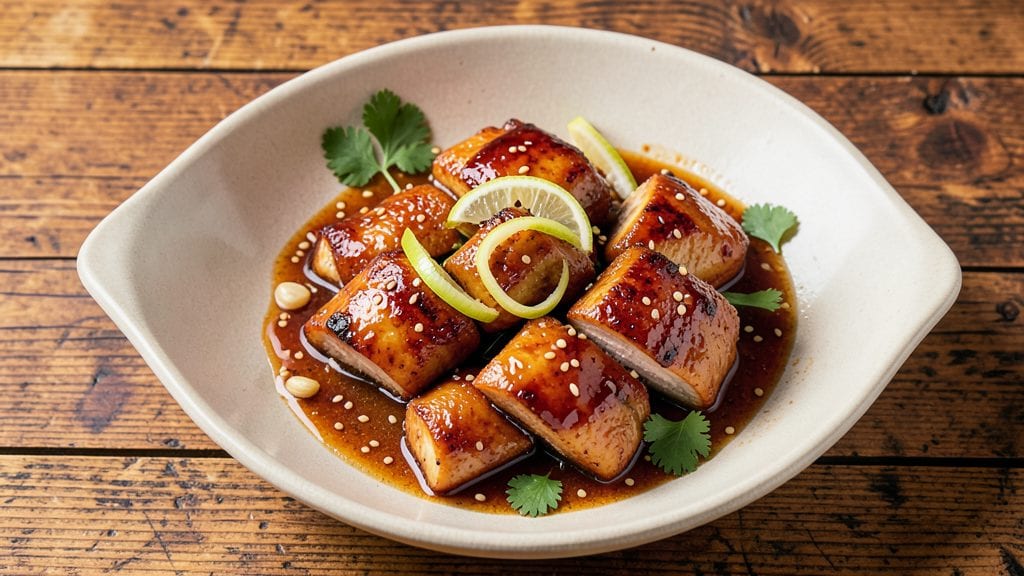
This copycat teriyaki chicken recipe delivers the same restaurant-quality flavor you crave at home, with a perfect balance of sweet, savory, and umami. The secret lies in marinating the chicken overnight, ensuring tender meat that absorbs the sauce completely—just like your favorite Asian bistro.
I've perfected this method over years of testing, and the result is a dish that's foolproof yet feels like a special occasion.
The recipe begins with a simple yet powerful marinade that tenderizes the chicken while infusing it with deep flavor. You'll grill or pan-sear the chicken to golden perfection, then finish it with a homemade teriyaki glaze that caramelizes beautifully.
This isn't just a recipe; it's a complete meal experience that pairs effortlessly with steamed rice and stir-fried vegetables for a satisfying, restaurant-style dinner.
What sets this apart is the sauce—rich, slightly sticky, and perfectly balanced between sweet and tangy. The glaze clings to the chicken, creating that signature glossy finish while keeping the meat juicy inside.
Every bite delivers that familiar, comforting flavor that makes this dish a crowd-pleaser, whether you're feeding a family or hosting dinner guests.
Ready in about 30 minutes of active time (plus overnight marinating), this recipe proves you don't need special skills to recreate restaurant-quality meals at home. The instructions walk you through each step, from marinating to plating, ensuring you achieve that same golden, glazed perfection every time.
Ingredients for copycat teriyaki chicken
Fourteen ingredients transform into restaurant-style teriyaki chicken with that signature sticky glaze.
| Ingredient | Amount | Notes |
|---|---|---|
| Boneless, Skinless Chicken Thighs 🍗 | 1 ½ lb | Cut into 1-inch pieces for even cooking |
| Soy Sauce 🍶 | ½ cup | Low-sodium preferred for balance |
| Brown Sugar 🍚 | ½ cup | Packed, not scooped |
| Honey 🍯 | ¼ cup | Wildflower for depth of flavor |
| Rice Vinegar 🍶 | ¼ cup | White or seasoned, not apple cider |
| Fresh Ginger 🌿 | 2 tbsp | Finely grated, aromatic |
| Garlic Cloves 🧄 | 4 cloves | Minced, not pre-minced jarred |
| Sesame Oil 🫒 | 1 tbsp | Toasted, for aroma |
| Vegetable Oil 🫒 | 2 tbsp | For high-heat searing |
| Cornstarch 🌾 | 1 tbsp | For glaze thickening |
| Water 💧 | 2 tbsp | For cornstarch slurry |
| Sesame Seeds 🌾 | 1 tbsp | Toasted, for garnish |
| Green Onions 🧅 | 3 whole | Sliced, for garnish |
| Salt 🧂 | 1 tsp | Kosher or sea salt |
| Black Pepper 🌶️ | ½ tsp | Freshly cracked |
The chicken thighs are key—bone-in, skin-on stays juicier, but boneless works too. Grab free-range if you can, or Costco Kirkland Signature for a budget-friendly option. Fresh ginger and garlic? Don't use jarred minced—the flavor's off. The soy sauce matters too: Kikkoman is the gold standard, but San-J or Hawaiian Gold work in a pinch. Toast your sesame seeds in a dry pan for 30 seconds—that nutty aroma makes all the difference. For the brown sugar, light or dark both work, but light has a cleaner finish.
No sesame oil? Toasted peanut oil gives similar depth. Running out of rice vinegar? Apple cider vinegar at half the amount works, but it'll taste slightly different. The cornstarch slurry is non-negotiable for that signature glossy glaze—arrowroot powder works too, but cornstarch is what you'll find in most Asian bistros. Prefer chicken breast? Use thighs and breasts together—they cook at different rates. And if you're short on time, marinate for just 4 hours instead of overnight (though it won't be quite as tender).
Marinated chicken keeps 2 days in the fridge—use within that time for best texture. The glaze reheats beautifully, so make extra and freeze it in ice cube trays for quick meals later. Store cooked chicken in an airtight container with a paper towel pressed on top to absorb moisture. Leftovers reheat best in a skillet over medium heat with a splash of water to keep things saucy.
Why You'll Love This Recipe
- One-Pan Magic: I swear by this recipe—just toss the chicken thighs in the sauce, pop them on a sheet pan, and let the oven do the work. No pots, no pans, no stress.
- Sweet-Savory Balance: That honey and brown sugar combo with soy sauce? It’s ridiculously good—sticky, glossy, with just the right tang from rice vinegar to cut through the richness.
- Meal Prep MVP: Double the batch, store it in the fridge, and reheat portions all week. The thighs stay juicy, and the sauce thickens up perfectly for leftovers—no sad, dry chicken here.
- Budget-Friendly Feast: Chicken thighs are cheaper than breasts, and this recipe stretches easily for four servings. Honestly, it’s my go-to when I need a filling, flavorful dinner without breaking the bank.
Step-by-step instructions for glazed teriyaki chicken
Here's how to recreate that restaurant-worthy teriyaki glaze—sticky, sweet, and perfectly balanced.
Prepare the Chicken and Marinate
Cut the 1.5 lb boneless, skinless chicken thighs into 1-inch pieces for even cooking. In a large bowl, combine the chicken with 0.5 cup soy sauce, 2 tbsp fresh ginger, 4 minced garlic cloves, 1 tbsp sesame oil, 1 tsp salt, and 0.5 tsp black pepper. Mix gently to coat the chicken evenly.
Let the chicken marinate for at least 30 minutes (or up to 2 hours in the refrigerator). This step infuses the meat with flavor and ensures tender, juicy results. You'll notice the chicken starts to absorb the marinade and develop a subtle sheen—this is your signal it's ready for cooking.
Sear the Chicken for Maximum Flavor
Heat 2 tbsp vegetable oil in a large skillet over medium-high heat until shimmering. Working in batches to avoid overcrowding, add the marinated chicken and cook for 4-5 minutes per side until golden brown and cooked through. The chicken should release easily from the pan—if it sticks, don't force it; let it cook a bit longer.
Once all the chicken is seared and cooked to an internal temperature of 165°F, remove it from the skillet and set it aside on a plate. You'll want to keep it warm while you prepare the glaze, but not so hot that it finishes cooking prematurely.
Make the Teriyaki Glaze
In the same skillet (no need to clean it—the browned bits add depth), reduce the heat to medium. Add 0.5 cup brown sugar, 0.25 cup honey, and 0.25 cup rice vinegar, stirring to combine. Let the mixture simmer for 3-4 minutes until it begins to bubble and slightly thicken.
In a small bowl, whisk together 1 tbsp cornstarch and 2 tbsp water to create a slurry. Slowly pour the slurry into the skillet while stirring constantly. The glaze will thicken dramatically—keep stirring until it reaches a smooth, glossy consistency that coats the back of a spoon. This should take about 2-3 minutes of gentle simmering.
Glaze the Chicken to Perfection
Return the seared chicken to the skillet and spoon the teriyaki glaze evenly over the top. Increase the heat to medium-high and let the chicken cook for 1-2 minutes, basting it with the glaze until it's fully coated and the sauce caramelizes slightly. You'll see the glaze bubble and turn a beautiful amber color—this is when the magic happens.
Taste the glaze and adjust the seasoning if needed. If it's too sweet, add a splash of rice vinegar; if it's too tangy, stir in a pinch of brown sugar. The glaze should be sticky but not overly runny—it should cling to the chicken like a second skin.
Garnish and Serve
Transfer the glazed chicken to a serving platter and sprinkle with 1 tbsp toasted sesame seeds and 3 sliced green onions. Serve immediately over steamed rice or noodles, letting any extra glaze pool at the bottom of the plate for dipping. The chicken should be tender, juicy, and coated in a glossy, slightly caramelized glaze that balances sweet, salty, and umami flavors.
For extra flair, drizzle a little extra glaze over the top just before serving. This dish tastes even better the next day, so it's perfect for meal prep or leftovers—just reheat gently to keep the glaze from becoming too thick.
Pro Tips For Making Copycat Teriyaki Chicken
- CRANK THE HEAT FIRST: Start your chicken thighs in a screaming-hot pan—no waiting for it to warm up. I used to take my time here, and the sauce would just steam instead of caramelize. Get that pan ripping hot, then add the thighs for those perfect crosshatch sear marks before you even think about sauce.
- WHISK THE SAUCE THICK: Don’t just toss the soy, sugar, honey, and vinegar together—whisk it hard over medium heat until it’s syrupy enough to coat the back of a spoon. I learned this after making sauce that looked like watery glue. Simmer it 3-4 minutes until it thickens noticeably, or your chicken will swim in a sad, thin glaze.
- PAT DRY THOSE THIGHS: Grab paper towels and really dry the chicken after patting—moisture is the enemy of crispy edges. I skipped this once and ended up with soggy, flavorless thighs that absorbed sauce like a sponge. Five seconds extra now saves you from regret later.
- USE A SPLASH OF WATER: When the sauce starts sticking to the pan, add 2 tablespoons of water and scrape up those browned bits. Sounds weird, but it works: those bits pack way more flavor than fresh sauce. Just stir it in and let it reduce back down before tossing the chicken. (Yes, even if you’re impatient like me.)
Pro cooking tips for perfect results
Marinade Mastery
The overnight marinade is where the magic begins—I swear by it for tender, flavorful chicken. Use a ziplock bag or airtight container to keep the chicken fully submerged in the marinade.
If you're short on time, even 4 hours in the fridge works, but overnight (12-16 hours) gives the best results. Pro tip: Add 1 tbsp of mirin to the marinade if you have it—it adds a subtle sweetness that elevates the dish. 💫
High-Heat Searing
For that perfect golden crust, your pan needs to be ripping hot—I mean smoking-hot—before adding the chicken. A carbon steel skillet or cast iron pan like Lodge conducts heat best, but any heavy pan works.
If your chicken sticks, it’s not the pan—it’s the heat. Let the chicken sit for 1-2 minutes after adding it to the pan to help the marinade set before gently moving it around. 🔥
Glaze Thickening Tricks
The cornstarch slurry is non-negotiable for that signature glossy finish, but timing is everything. Once you add the slurry, stir constantly for those 2-3 minutes—if you walk away, it’ll clump. For extra shine, add 1 tsp of honey at the end and simmer for 30 seconds more.
If the glaze is too thick, thin it with 1 tsp of water; too thin? Add ½ tsp cornstarch mixed with 1 tsp water and stir until smooth. 💡
Caramelization Control
When basting the chicken with the glaze, work quickly—1-2 minutes max over medium-high heat. You want that amber caramelization, but not burnt bits. If the glaze burns before the chicken is fully coated, reduce the heat to medium and keep stirring.
A silicon spatula helps scrape up those delicious browned bits from the bottom of the pan. 🌡️
Resting and Reheating
Let the chicken rest for 5 minutes after glazing—this helps the sauce set and keeps it from sliding off when you serve. For leftovers, reheat in a skillet over medium heat with 1 tbsp of water to prevent drying.
Microwave reheating? Bad idea—it turns the glaze rubbery. Store cooked chicken in an airtight container with a paper towel on top to absorb excess moisture. 💪
Garnish Like a Pro
Toast your sesame seeds in a dry pan for 30 seconds until fragrant—this adds a nutty depth. Slice the green onions at an angle for a pop of color. For extra flair, drizzle with a few drops of sesame oil just before serving.
The contrast of the toasted seeds and fresh herbs makes the dish look (and taste) restaurant-worthy. ✨
Nutrition facts
Frequently asked questions
Can I use chicken breast instead of thighs?
Yes, but with adjustments! Chicken breast cooks faster and dries out more easily. Use 1 lb boneless breasts cut into ½-inch thick pieces, and reduce marinating time to 2-4 hours max (breast doesn't need overnight). Sear at medium heat for 3-4 minutes per side—don't overcook! The glaze will still stick, but keep an eye on doneness to avoid dryness.
How do I fix a glaze that's too runny?
If your sauce is too thin, mix ½ tsp cornstarch with 1 tsp water and stir it into the glaze while simmering. Keep stirring constantly for 1-2 minutes until it thickens. For extra insurance, add a pinch of cornstarch directly to the sauce and whisk vigorously. The glaze should coat the back of a spoon without dripping.
Can I make this in a slow cooker?
Skip the searing step and add marinated chicken to the slow cooker with the sauce ingredients (except cornstarch slurry). Cook on low for 3-4 hours or high for 2 hours, then thicken the glaze separately by simmering cornstarch + water in a pan. The chicken will be tender but less caramelized—great for meal prep!
What if my chicken turns out dry?
Dry chicken usually means overcooking or skipping the marinade. For next time: Use thighs (they stay juicier), don't overcrowd the pan, and cook to 165°F max. If it happens, revive it by reheating in a skillet with 2 tbsp water or broth over low heat for 2-3 minutes—the steam will plump up the meat.
Can I use this sauce on other proteins?
Yes! This glaze works beautifully on salmon (cook at 145°F), tofu (press first), or shrimp (cook 2-3 minutes per side). For pork or beef, reduce honey slightly (1 tbsp) to balance the richness. Adjust cooking times—delicate proteins like shrimp need quick searing, while beef should be medium-rare before glazing.